How to Display Author Info in Articles and Structured Data with a-blog cms
Change Log
- 2022-08-03 : Improved the content for "Use the entry" by using the entry ID and global variables.
- 2022-01-08 : I added a wonderful technique suggested by Genovese Terasaki-san (@genovese115) on Twitter.
About this article
This is the 10th day's article for the a-blog cms Advent Calendar 2021 - Adventar.
Websites displaying author information in articles are becoming popular.
With the Japanese CMS a-blog cms, you can build this type of website with the default features provided by the CMS, since you can flexibly set and display custom fields.
In this article, I have considered three ways to achieve this.
1 and 3 have been successfully deployed in actual projects. As for 2, it has been proven to some extent in a test environment.
- using users
- using categories
- using entries
Ideal author info displayed in a article
First, I think articles (entries) should contain the following information.
- Profile photo
- Name
- Title
- Profile text
- Author's website/profile page
- Author's SNS
Depending on the method used, it may or may not be possible to display the information, and some tricks may be required.
Things to consider as common benefits
The primary requirement for any of these methods is that the information of the authors be managed in one place.
Use the user
Overview
This method allows you to display the user information of the CMS that wrote the entry in the entry.
By default, you can register the following information in a-blog cms users.
In a-blog cms, an article is called an entry.
So, in In this article, I will refer to an entry as an article.
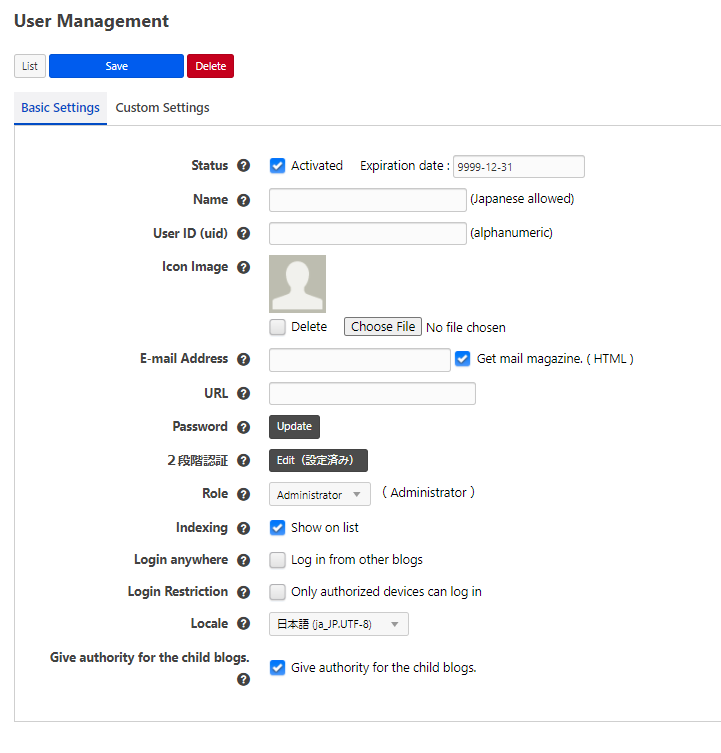
You can define any information that is not listed here by creating custom fields.
To prepare custom fields for user information, write the code in the following file.
themes\{your-theme}\admin\user\field.html
The data written in this file will be displayed in the custom settings of the user management.
How to display user information in entries
User information registered in the CMS, including custom fields, can be displayed in the userField block of the Entry_Body module.
See here for the variables for Entry_Body.
https://developer.a-blogcms.jp/document/acms-code/vars/Entry_Body.html?cache=off
Common merit : manage author info in one place
In this method, by checking the Give authority for the child blogs checkbox in the user management, you can display author information among child blogs.
Merit 01 : Easy to know who wrote the entry.
One of the advantages of this method is that you can easily tell who wrote the entry.
When you log in to the control panel and check the entry, you can immediately see, "Oh, this entry was written by this person".
For example, if multiple people are managing your site, and you need to revise an entry, you can immediately know who to ask to revise it.
I think this is the easiest way to manage the site.
Merit 02 : You can display user's custom fields in the entry
In the userField block of Entry_Body module, you can display user's custom fields.
You can break the author information into the following types.
- Profile photo (default)
- Name (default)
- Title (custom field)
- Profile text (custom field)
- Author's website profile page (default)
- Author's social network (custom field)
In any case, you can code this easily because this module can use custom fields.
Demerit : There is a limit of the number of users
One of the disadvantages is that there is a limit to the number of users depending on the plan.
Click here for information about plans (licenses). Licenses|a-blog cms
If you are running a large media site, where the writers are not CMS users, and you want to start running the site at a low cost, you may need to consider a different approach.
Or, if you have an operation scheme where you receive articles from writers and the site administrator registers them, this may be the case.
Use the categories
Overview
In this method, authors are managed as categories.
The following information can be registered in a category in a-blog cms by default.
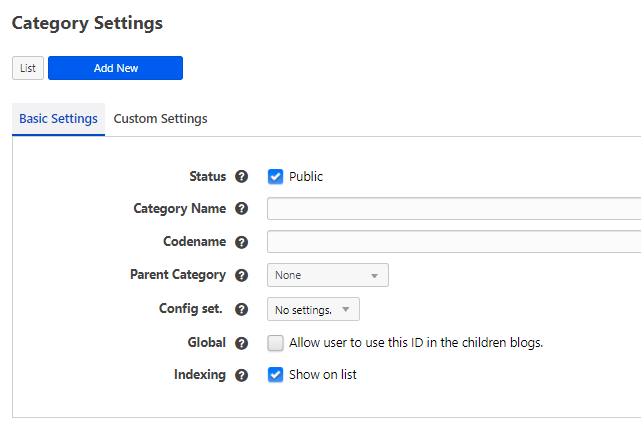
You can create additional information that is not listed here by creating a custom field.
To create custom fields for categories, write the code in the following file.
themes\{your-theme}\admin\category\field.html
The code you write here will be displayed in the custom settings of the category edit page.
If you want to change the custom field based on the category, you can do so by adding a conditional statement in the file themes\{your-theme}\admin\category\field.html.
Alternatively, if you want to change by URL context, add the following code to field.html and create the respective files in the corresponding directories.
@include("/admin/category/bcd/%{BCD}.html")
@include("/admin/category/rccd/%{RCCD}.html")
@include("/admin/category/ccd/%{CCD}.html")
You can learn a lot about this by looking at the theme files officially distributed.
Consider a practical example of using a category.
In this case, you may have a main category for your entries, and you want to give the author information to them as a subcategory.
If you want to use the subcategory feature in a-blog cms, you need to configure it.
In the Administration page > Config > Edit Settings, check the Sub Category option.
The details are summarized in the following official documentation.
Let's use the new subcategories feature | a-blog cms developer
The category structure
Let's consider the following structure.
- Root Blog
- Category : News
- Category : Product Information
- Category : Author * Make it global
- Category : Taro Yamada *Make it global
- Child Blog
- Various Categories
Display subcategory information in entries
Again, we will use the basic module Entry_Body to display entries.
In this case, for example, we assume that the main category of the entry is Product Information, and that a subcategory Taro Yamada is applied for the author information.
The author information to be registered in the entry will be in the subcategory.
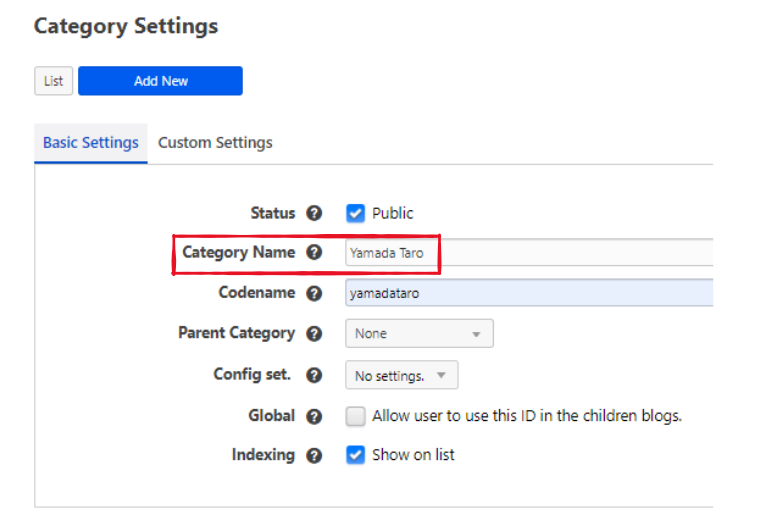
In Entry_Body, you can display sub-category information in the sub_category block, but unlike the main category, you cannot display custom fields for subcategories.
Therefore, the entry can display the name of the author configured in the category name, as shown in the red box below.
Now, in this case, the author's information will be registered in the category as follows.
In this case, you can't display custom fields in Entry_Body.
- Profile photo (custom field)
- Name (default)
- Title (custom field)
- Profile text (custom field)
- Author's website profile page (custom field)
- Author's social network (custom field)
So how to display the custom field for the author category?
This may require a bit of work.
I think it can be done with the same trick as described later in the case of "using the entry" section.
Common merit : manage author info in one place
Now, managing authors in one place can also be done with categories.
In the category settings, there is an option, Global to Allow user to use this ID in the children blogs..
See the red box below.
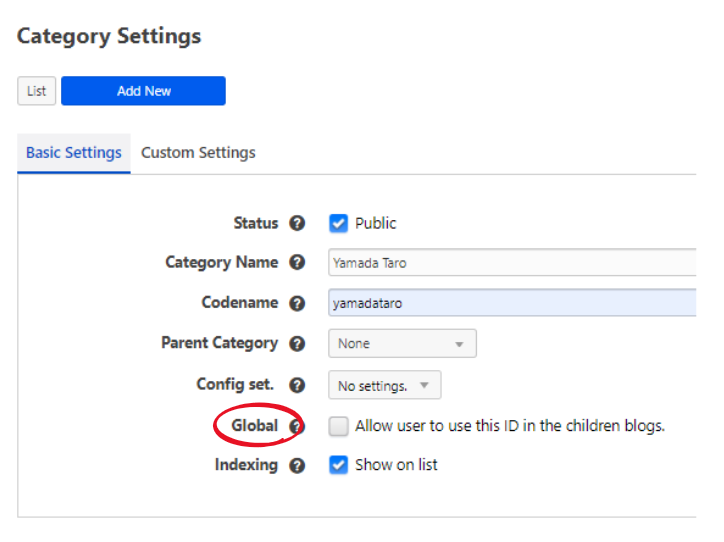
This allows you to centrally manage author information, even if the site has child blogs.
This feature is useful if you have categories that you want to manage across your site.
Merit 01 : Easy to display a list of articles by author
The advantage of using categories is that you can easily display a list of articles by author using a module that displays a list of articles, such as Entry_Summary.
Merit 02 : You can make a simple profile page
If you manage author information with categories, you can turn the list page into a simple profile page.
Since author information applied to an entry is registered as a subcategory, it is not possible to display the custom fields of the subcategory in Entry_Body, but the category itself is unique.
Therefore, the information of the custom fields of the author category can be displayed in such as Entry_Summary.
For example, suppose we have an article A.
The following categories are registered to that article.
- Entry : Article A
- Main Category : Product Information
- Sub Category : Yamada Taro, a child category of the author category
Note that the category "Product Information" and the category "Taro Yamada" are both categories, not superior or inferior as main or sub categories.
The subcategory feature is just a feature to register a main and sub category for one entry.
Therefore, if you want to display a list of entries by category in Entry_Summary, you can display custom fields for any category.
For instance, if you want to display a list of entries for Yamada Taro, a child category of the Author category, the following URL might be used.
https://domain/author/yamadataro/
If you use the Entry_Summary module to display a list of entries, you can display custom fields in the categoryField block, so when you access this URL, you can display the following custom fields for the author's category.
- Profile photo (custom field)
- Name (default *this can be a default name or a custom field)
- Title (custom field)
- Profile text (custom field)
- Author's website/profile page (custom field)
- Author's social network (custom field)
In other words, you can display the author's profile on the article list page.
Demerit : Displaying custom fields in entries requires a little trick
As mentioned above, Entry_Body cannot display custom fields for subcategories, so you need a little trick to display detailed information about the author in the entry.
I will explain this later.
Use the entry
Overview
In this method, we create a blog for author registration and manage author information as entries.
Updated at 2022-08-03.
Changed the method from the originally stated method to "Passing the author's blog entry ID" to a custom field in the regular article. The front end uses the ID as a key to search for the author's blog entry". The reason is described below.
Also, this method uses a custom global variable.
Structure of the blog
We assume the following structure.
- Root blog
- Category
- Blog for author information:
Author blog- Entries for author information
- Various child blogs
- Categories
How to display author entry information in an entry.
In this case, the use of custom fields is essential.
First, prepare the following custom field for the author blog entry.
Only the name should be the name of the entry, not a custom field.
- Profile photo
- Name (should be the name of the entry)
- Title
- Profile text
- Author's website/profile page
- Author's SNS
Custom fields for entries can be written as follows, or use conditional statement.
\{your-theme}\admin\entry\field.html
For conditional statement by URL context, add the following code to field.html.
@include("{your-theme}/admin/entry/bcd/%{BCD}.html")
If the author's blog code is author, make the file in the following directory and write custom fields.
\{your-theme}\admin\entry\bcd\authors.html
Again, Entry_Body is used to display the article.
The custom fields registered in the author's blog entry cannot be displayed in other article entries without some codes.
We need to connect the two data sets.
- An entry as an article
- An entry in the
author's blogto register the author's information
One of the methods to achieve this is as follows.
Prepare a custom field in the article entry to display the author information, and let the user select the value of the custom field in theauthor blog entryfor the value.- Provide a custom field
author_eidto display author information in the article entry, passing theauthor blog entry ID (EID)as its value
If you use this method, the admin page of the entry edit will look like this.
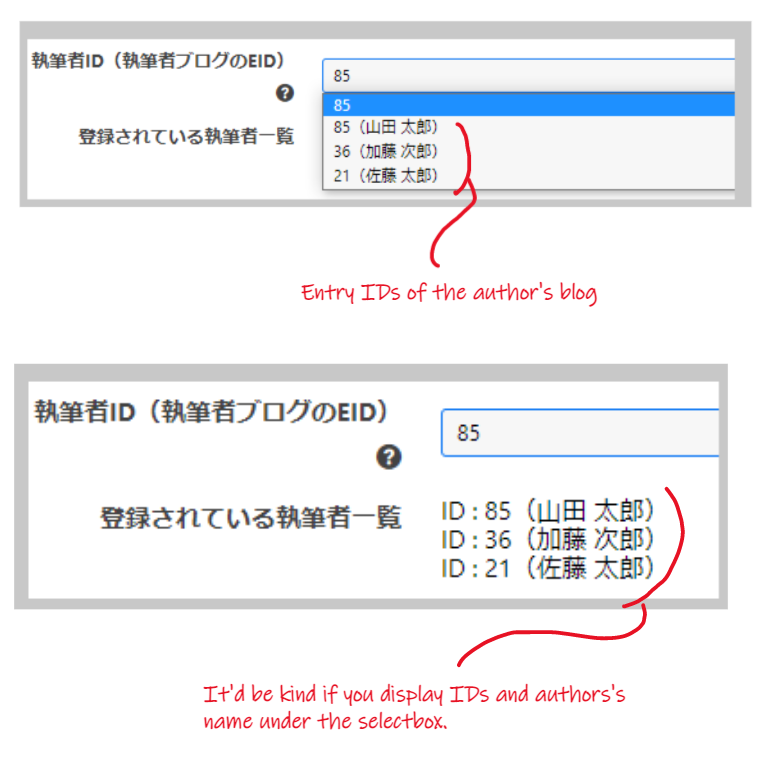
Let users select an EID from the author's blog.
In this example, the entry title of the author blog is listed using a module such as Entry_List.
Then, the EID selected there is stored in the custom field author_eid provided for the article entry.
And on the front end, conversely, use author_eid to search for author blog entries and display the custom fields (title, profile text, etc.) for the corresponding EID.
Originally, in fact, I had the same number of custom fields for the author's blog entry (name, profile text, etc.) as I had for the articles where I wanted to display information, and passed the information to each of them.
For example, the EID passed to author_eid would be used as a hook to automatically set the other custom fields using JavaScript.
The disadvantage of this was not only the amount of code, but also that if there is a change in the author's blog entry, that information is not automatically reflected in the article where you want to display the author information.
This is not surprising because they are different custom fields....
Here is the improved code.
The actual code
First is the code to pass the EID of the author's blog entry to the custom field author_eid provided for regular articles.
In this case, we will create and write the following file.
\{your-theme}\admin\entry\field-author.html
The contents are as follows, using Entry_List and the external context ctx to display a list of entries only for the author's blog.
In this example, the BID of the author blog is 3.
<table class="adminTable acms-admin-table-admin-edit">
  <tr>
    <th>Author ID (EID for author's blog)
      <i class="acms-admin-icon-tooltip js-acms-tooltip" data-acms-tooltip="Please check the name corresponding to the ID in the select box."></i>
    </th>
    <td>
      <select name="author_eid" class="acms-admin-form-width-full">
        <!-- Specify any EID if no author is selected -->
        <!-- BEGIN_IF [{author_eid}/em] -->
        <option value="1" {author_eid:selected#}1>1</option>
        <!-- ELSE -->
        <!-- Specify the variable if given -->
        <option value="{author_eid}" {author_eid:selected#}{author_eid}>{author_eid}</option>
        <!-- END_IF -->

        <!-- Create a select box for the list of authors (author blog entries) -->
        <!-- BEGIN_MODULE Entry_List id="author_blog_entry_list" ctx="bid/3" -->
        <!-- BEGIN entry:loop -->
        <option value="{eid}" {author_eid:selected#}{eid}>{eid}({title})</option>
        <!-- END entry:loop -->
        <!-- END_MODULE Entry_List -->
      </select>
      <input type="hidden" name="field[]" value="author_eid" />
    </td>
  </tr>
  <tr>
    <th>List of registered authors</th>
    <td>
      <!-- BEGIN_MODULE Entry_List id="author_blog_entry_list" ctx="bid/3" -->
      <!-- BEGIN entry:loop -->
      ID : {eid}({title})<br>
      <!-- END entry:loop -->
      <!-- END_MODULE Entry_List -->
    </td>
  </tr>
</table>
Next is the front-end code.
Again, we use Entry_List and the external context ctx.
The key point is that ctx="bid/3/eid/%{AUTHOR_EID}" is used to specify the BID of the author's blog and the EID of the author to be displayed.
Since the EID of the author's blog and the custom field author_eid of a normal article have the same value, you can retrieve the corresponding author's entry by specifying it in this way.
However..., "ctx="bid/3/eid/{author_eid}"" will not work correctly.
This is because there is no custom field for author_eid in the author blog (bid/3) entries (author_eid is a custom field provided for regular articles).
Therefore, we need to make author_eid a global variable so that it can be called from anywhere.
The front-end code is described first.
Except for title, other fields such as profile_url are custom fields provided for the author's blog entries.
<!-- Get information from the custom field "Author ID" (EID of the author's blog) -->
<!-- BEGIN_MODULE Entry_List id="author_blog_entry_list" ctx="bid/3/eid/%{AUTHOR_EID}" -->
<!-- BEGIN entry:loop -->
<div>
<div>
<div>
<p>Author</p>
<p><!-- BEGIN_IF [{profile_url}/nem] --><a href="{profile_url}">{title}</a><!-- ELSE -->{title}<!-- END_IF --><!-- BEGIN name_kana:veil --> - {name_kana}<!-- END name_kana:veil --></p>
</div>
<div>
<p><!-- BEGIN org_main_name:veil -->{org_main_name}<!-- END org_main_name:veil --><!-- BEGIN org_main_role:veil --> {org_main_role}<!-- END org_main_role:veil --></p>
</div>
</div>
</div>
<!-- END entry:loop -->
<!-- END_MODULE Entry_List -->
The next step is to make author_eid a global variable.
Here you should also refer to the official documentation.
How to create global variables | a-blog cms developer
First, enable the hooks in config.server.php as follows
define('HOOK_ENABLE', 1);
Next, edit the following files
\extension\acms\Hook.php
The documentation said /php/ACMS/User/Hook.php, but I think the above is probably the correct file now.
The place to edit is the extendsGlobalVars section.
Write as follows.
/**
 * Extending Global Variables
 *
 * @param array $globalVars
 */
public function extendsGlobalVars(&$globalVars)
{
    // Make the author ID in the custom field of the entry a global variable
    if ( EID ) {
        $Field = loadEntryField(EID);
        $globalVars->setField('AUTHOR_EID', $Field->get('author_eid'));
    }
}
That's all done.
Common merit : manage author info in one place
Author information can be globally managed in the author blog.
Merit 01 : Easy to create author's profile page
The advantage of this method is that it is easy to create a profile page for the author.
The reason for this is that the author's profile page is an entry, so you can use the units provided in the entry.
If you want to create a detailed profile page, I think this method is effective.
Demerit : Displaying author information requires some tricks.
As mentioned above, you need some tricks.
How to display a list of articles by authors
Unlike categories, this method requires post-includes or custom field searches to narrow down the entries to be displayed.
Combination
Genovese Terasaki-san taught me another approach on Twitter.
a-blog cms awards 2021を受賞された清水さんの記事!
— ジェノベーゼ寺崎 (@genovese115) December 9, 2021
僕が実装するならあわせ技で
①執筆者情報はユーザで管理
②ユーザはライセンス制限のない「読者」権限で発行
③エントリーにユーザIDをカスタムフィールドで保存
④User_Fieldモジュール(ctxで③の値を渡す)で情報を表示
のようにするかな〜 https://t.co/8BYi19dMF1
Subscriber Role would be a very efficient way to do this, since there is no limit to the number of users. This approach was an eye-opener.
Thank you, Genovese Terasaki-san!
(Perhaps this method also requires the use of global variables.)
Markup of structured data
Now, with the method introduced here, structured data markup is possible.
In a-blog cms, a template file for structured data markup is provided in the distributed themes, and it supports structured data for breadcrumbs by default.
Therefore, you can add new data by customizing this file.
The template files for structured data are provided below.
\{your-theme}\include\head\structured-data.html
Google provides a feature called Rich Results to extend the display of search results.
For general article pages, Article structured data markup is available.
Please refer to the following articles for information on Rich Results and Enriched Results, which is a further enhancement of Rich Results.
- Learn About Article Schema Markup | Google Search Central | Google Developers
- Enriched and Interactive Search Results | Google Search Central | Google Developers
The following is an example of combining structured data of type Article with Breadcrumbs.
The information about entries, users, and categories are output in {}.
[
 {
  "@context": "https://schema.org",
  "@type": "BlogPosting",
  "headline": "{article-headline}",
  "description": "{article-description}",
  "mainEntityOfPage": {
   "@type": "WebPage",
   "@id": "{article-url}"
  },
  "image": {
   "@type": "ImageObject",
   "url": "{article-image-path}",
   "width": {article-image-width},
   "height": {article-image-height}
  },
  "datePublished": "{article-published-date}",
  "dateModified": "{article-updated-date}",
  "author": {
   "@type": "Person",
   "name": "{article-author-name}",
   "image": "{article-author-image-path}",
   "url": "{article-author-url}",
   "sameAs": [
    "{article-author-sns-url-01}",
    "{article-author-sns-url-02}"
   ],
   "alternateName": "{article-author-other-name}",
   "worksFor": {
    "@type": "Corporation",
    "name": [
     "{article-author-organization-name-01}",
     "{article-author-organization-name-02}"
    ],
    "url": "{article-author-organization-url}",
    "url": "{article-author-organization-other-url}"
   }
  }
 },
 {
  "@context": "http://schema.org",
  "@type": "BreadcrumbList",
  "itemListElement": [
   // Default breadcrumb information code
  ]
 }
]
In addition to Article, Google provides many other types of structured data markup, such as videos, recipes, jobs, etc.
I think you can apply it to various types by using custom fields and conditional branches in a-blog cms.
By the way...
I tried to display the author information using post-include feature, but in this case, I could not output the author information in structured data, so I omitted it from consideration.