How to set up custom domain in Microsoft365 and use Microsoft's email service
About Exchange Online
Microsoft Exchange Online is the cloud version of Microsoft Exchange Server, Microsoft's email server. Users of Microsoft 365 Business Standard can use this service without extra fee.
The following features are provided:
- Advanced security features : anti-malware and anti-spam filtering capabilities
- Management Center: Control panel for efficient management of your organization
- Mobile Device Policy: Create a list of authorized mobile devices and enforce PIN locks. You can also delete sensitive company data from lost smartphones.
- Anywhere Access: Access email, calendars, and contacts from anywhere, on any device, using any major browser
- Outlook Integration
- Use of your custom domain
You will be able to use Microsoft mail servers on your own domain.
Official Site
Microsoft Exchange
Step 1 : Apply your own domain in the Microsoft365 Admin Center
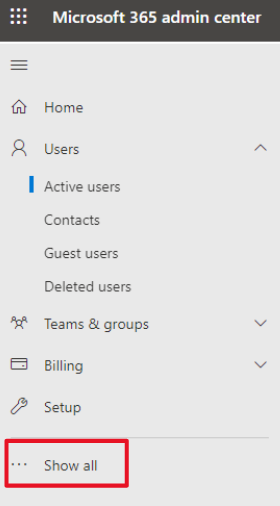
Go to the Microsoft365 Admin Center and click Show All from the right side menu to open the menu.
Microsoft 365 Admin Center
Setup - Microsoft 365 admin center
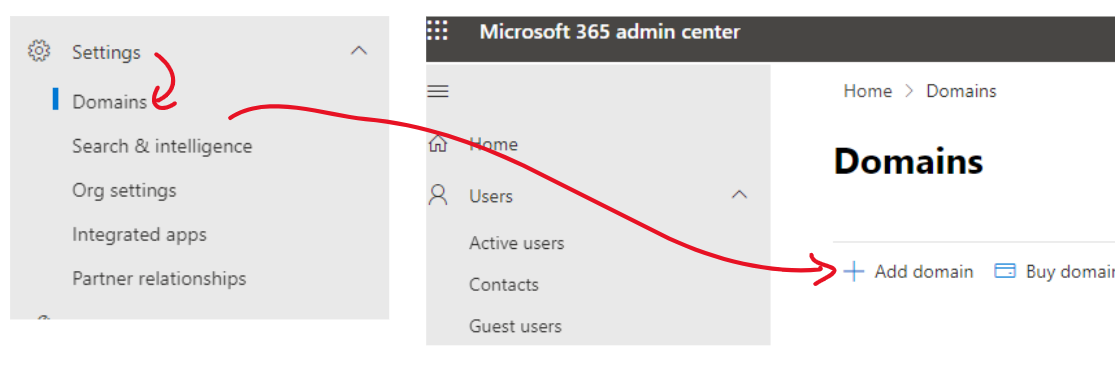
Then click on Settings > Domains.
A menu of domains will appear.
Click Add Domain at the top.
You will then be directed to the domain setup wizard.
First, enter the custom domain you wish to use and continue.
You will then be presented with options to authenticate your domain.
If you can edit the DNS records, choose the first option.
If you cannot edit the DNS record, choose the last option, which is to authenticate by uploading an authentication file to the server.
If you choose to edit the DNS record, you will see a text record (TXT), which you need to add from your domain's control panel.

After the initial authentication, the next step is to add the other records (TXT, MX, CNAME) for using the mail server to your domain admin panel.
The domain setup is now complete.
Step 2 : Create an email address in the Exchange Management Center
Micsoft 365 users have a domain email address of xxx.onmicrosoft.com applied by default.
Change this to your own domain email address that you have just set up.
The change is made in the Exchange Admin Center.
Exchange Admin Center
Exchange admin center
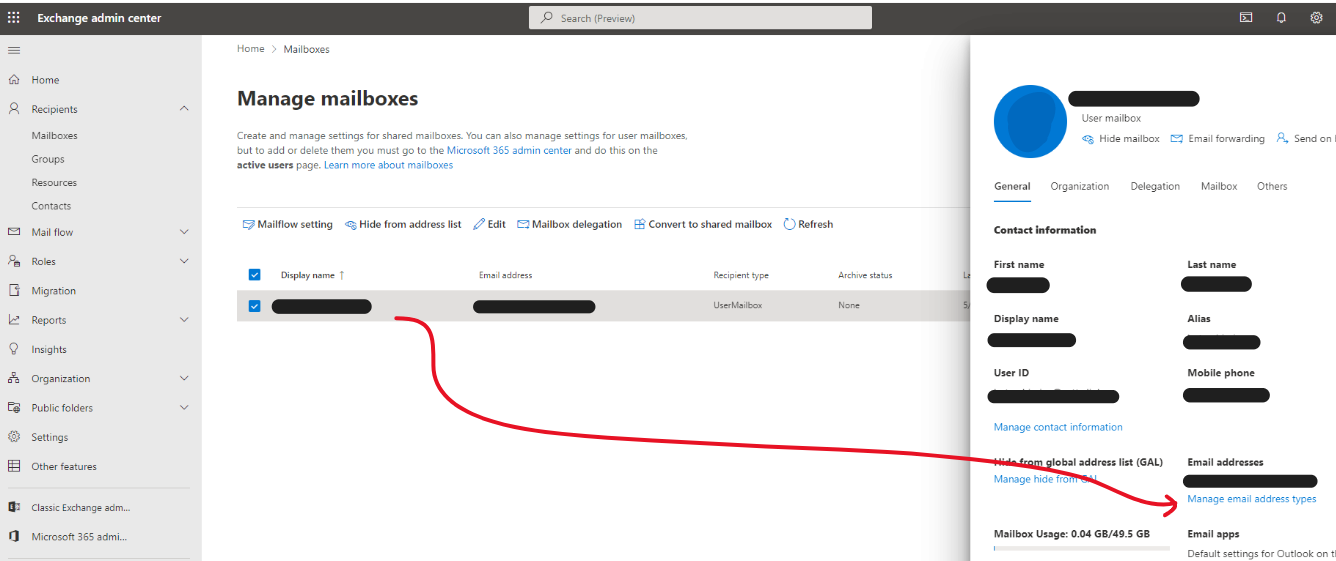
Once accessed, select the user you wish to change and click Manage Mail Address Types in the menu that appears on the right.
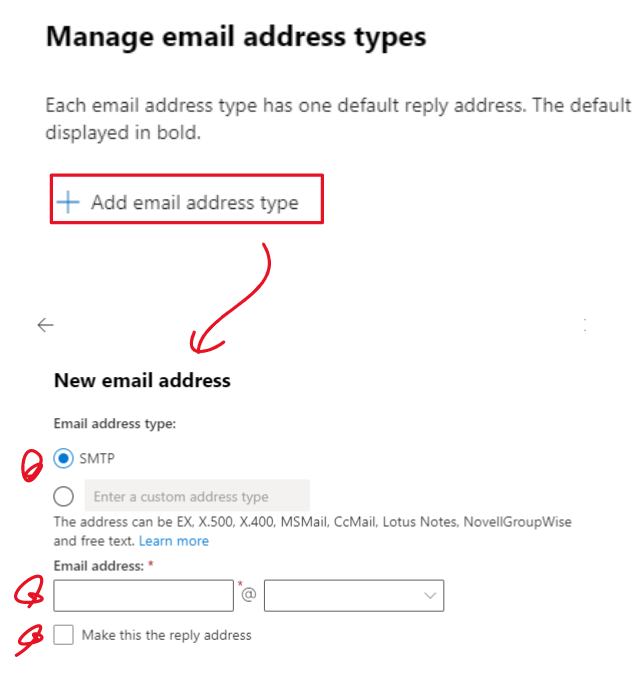
Then click on add email address type.
You will then see a menu where you can enter your email address.
With SMTP checked, enter the email address and domain you wish to use.
Then, check Make this the reply address and save it.
This will allow you to use your own domain for email.
Note that this setting will also change the email address you enter when logging into Micsoft365 from xxxxx.onmicrosoft.com to your own domain email address.
If you save without checking Make this the reply address, the email address will be created, but as an alias for incoming mail only.
An alias is like a sub e-mail address, and mail sent to an alias address also arrives in the inbox of the main e-mail (primary e-mail address).
However, as I mentioned earlier, it is basically for receiving only.
If you want to add an outgoing email address, it is better to add a user or create shared mailbox.
Shared Mailbox is a feature useful when you want to manage email addresses for more than one person, such as info@domain.com.
For more information, please see this article.
Step 3 : Using Email
Once you access Outlook Online, your email will be available immediately.
Outlook Online
Outlook Online
Step 4 : Adding Users
If, for example, your organization has more members and you want to create new e-mail addresses, it is better to add users instead of aliases.
Users and email addresses can be added from the Azure Active Directory Admin Center or the Microsoft 365 Admin Center Add Users menu.
Azure Active Directory Admin Center
Users - Azure Active Directory admin center
Micsoft365 Admin Center
Home - Microsoft 365 admin center