Create a site with markdown - Docusaurus Tutorial
Introduction
This article introduces the basic usage of Docusaurus, a static site generator that generates sites from markdown files.
Docusaurus is a useful tool for creating manual sites with a lot of information.
What's Docusaurus?
Overview
Docusaurus is a documentation site creation tool developed by Facebook for Facebook's open source software projects.
There are two versions of Docusaurus, v1 and v2.
Although v2 is still in beta, it is recommended that new users of Docusaurus use v2.
This article will also explain how to use v2.
For those who are already using v1, there is an official migration guide.
v1 to v2 migration guide
Migration overview | Docusaurus
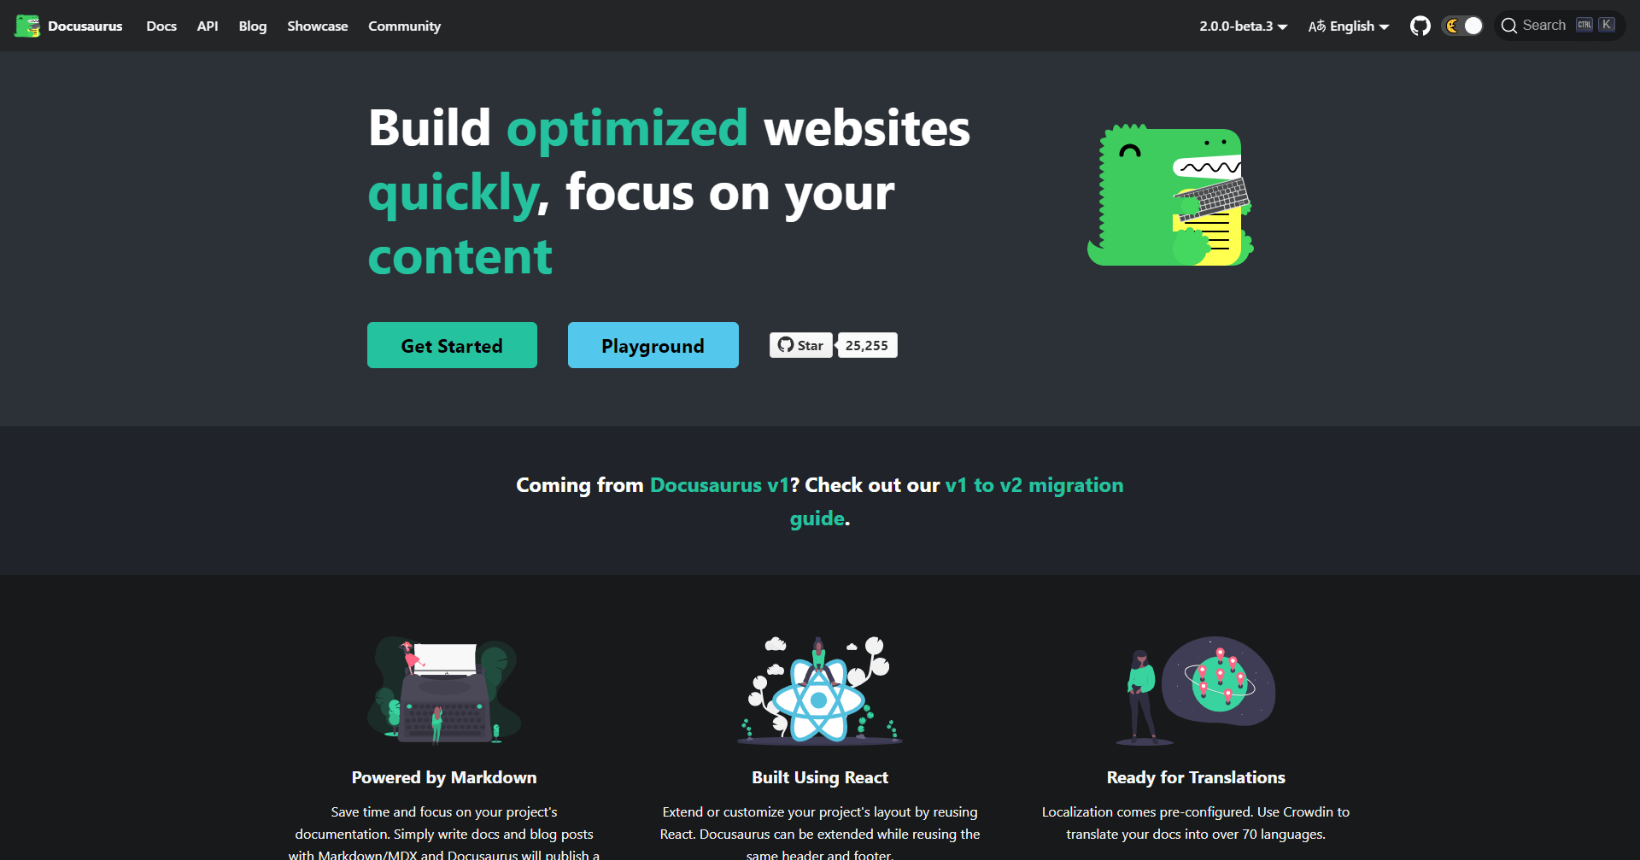
Official site
Build optimized websites quickly, focus on your content | Docusaurus
Features
Docusaurus has the following features.
- A static site generator (SSG)
- Good at building document sites.
- Converts markdown files to static sites.
- Supports React.
- Has features for multilingual sites
- Has a document version control function.
- Supports a site search function (Algolia documentation search)
- Has a deployment function
Although this is a tool for creating documentation sites, it can also be used to create pages, such as company profiles, blog posts.
Very useful for creating manuals.
I find Docusaurus useful for creating manuals that have some amount of pages.
Until a few years ago, I used to create instruction manuals and other documents with PowerPoint, Word, or plain text, but now I tend to create them using Docusaurus or other tools that support markdown.
The reasons are the huge reduction in production time, the ease of maintenance such as revisions and updates, and the fact that they are not dependent on web services such as Notion (although I do use it heavily).
Beside Docusaurus, I use StackEdit and Pandoc. Both of them convert markdown files to HTML files with a table of contents.
For manuals that can be written in a single page, I use StackEdit or Pandoc.
For more information on these tools, please refer to the following articles.
Check this article!
3 tools to convert Markdown to lovely HTML
When creating manuals on Docusaurus, sometimes these docs have what we don't want unrelated people to be able to see them, so we take the following preventive methods: restricting access by IP address, Basic authentication, and inserting noindex meta tags.
When using StackEdit or Pandoc to create manuals, you can simply hand the converted HTML and image files to the relevant people and let them view them on their own machines. However, with Docusaurus, you need to have a web server running even if you want to view them locally.
This is one of the points to keep in mind when using Docusaurus.
Usage
Things to build in this article
In this article, I will explain the basic steps to build a documentation site.
If you follow the steps in this article, you will be able to quickly build a two-column document documentation site.
I will use Docs as a feature of Docusaurus. I will not use Pages or Blogs.
This is referred to as Docs-only mode in the official documentation.
Prerequisite.
You will need to have Node.js version 12.13.0 or above installed.
Yarn is also available, in which case you will need to have version 1.5 or above installed.
Here is a quote from the official website :
Node.js version >= 12.13.0 or above (which can be checked by running node -v). You can use nvm for managing multiple Node versions on a single machine installed
Yarn version >= 1.5 (which can be checked by running yarn --version). Yarn is a performant package manager for JavaScript and replaces the npm client. It is not strictly necessary but highly encouraged.
In this article, I will explain the steps for Windows environment, but the process is the same for masOS.
Now, let's get started.
Create a working folder.
First, create a working folder.
Launch a terminal window and move to the working folder.
Navigate to the directory with a command line terminal.
cd the path of your working directory
Install Docusaurus
Install via a terminal.
The command is as follows.
npx @docusaurus/init@latest init [name] [template]
The name will be the name of the project folder. A directory of this name will be created and Docusaurus will be installed in it.
template is the name of the Docusaurus template.
Docusaurus recommends using classic, as it covers the basic features of Docusaurus, is easy to customize, and includes the features of Docusaurus 1.
There seems to be a facebook template for a site for Facebook's open source project, and a bootstrap template for a site using Bootstrap.
Unless you have a specific reason, the classic template is fine, so run the following command.
npx @docusaurus/init@latest init my-website classic
Rename my-website as you like.
You may see the following message during the installation process, but you can click Yes.
Need to install the following packages:
  @docusaurus/init@latest
Ok to proceed? (y)
Directory Structure
When you install the classic template, Docusaurus will be installed with the following directory structure.
my-website
├── blog
│   ├── 2019-05-28-hola.md
│   ├── 2019-05-29-hello-world.md
│   └── 2020-05-30-welcome.md
├── docs
│   ├── doc1.md
│   ├── doc2.md
│   ├── doc3.md
│   └── mdx.md
├── src
│   ├── css
│   │   └── custom.css
│   └── pages
│       ├── styles.module.css
│       └── index.js
├── static
│   └── img
├── docusaurus.config.js
├── package.json
├── README.md
├── sidebars.js
└── yarn.lock
The role of each directory is as follows(Quote from the official website).
- /blog/ - Contains the blog Markdown files. You can delete the directory if you do not want/need a blog. More details can be found in the blog guide
- /docs/ - Contains the Markdown files for the docs. Customize the order of the docs sidebar in sidebars.js. More details can be found in the docs guide
- /src/ - Non-documentation files like pages or custom React components. You don't have to strictly put your non-documentation files in here but putting them under a centralized directory makes it easier to specify in case you need to do some sort of linting/processing
- /src/pages - Any files within this directory will be converted into a website page. More details can be found in the pages guide
- /static/ - Static directory. Any contents inside here will be copied into the root of the final build directory
- /docusaurus.config.js - A config file containing the site configuration. This is the equivalent of siteConfig.js in Docusaurus v1
- /package.json - A Docusaurus website is a React app. You can install and use any npm packages you like in them
- /sidebar.js - Used by the documentation to specify the order of documents in the sidebar
The main directories and files used in the documentation site are as follows.
my-website
├── docs
│   ├── doc1.md
│   ├── doc2.md
│   ├── doc3.md
│   └── mdx.md
├── static
│   └── img
├── docusaurus.config.js
└── sidebars.js
Launch the site.
Now, once the installation of Docusaurus is complete, use a terminal to navigate to the installation directory.
cd path-to-my-website
Next, type the following command.
npm start
Now, a web server will be launched locally and the site will be displayed at http://localhost:3000/.
Note that batch processing is being executed during this process, and the browser will be reloaded when the file is updated.
To quit the web server, use the following command.
Ctrl(Cmd) + C
We' ll customize the site from here.
Make the docs directory the home page of your site.
In the default state, the /src/pages/index.js page is the home page of the site.
For a simple documentation site, this page will not be needed.
In this case, since we are going to build a documentation site with only pages under docs, the home page of the site will also be a page under the docs directory.
To do this, first open docusaurus.config.js and add the following code to the docs array under presets.
routeBasePath: '/',
You can add it above the following sidebarPath.
presets: [
 [
   '@docusaurus/preset-classic',
   {
     docs: {
       sidebarPath: require.resolve('./sidebars.js'),
       // Please change this to your repo.
       editUrl:
         'https://github.com/facebook/docusaurus/edit/master/website/',
     },
     blog: {
       showReadingTime: true,
       // Please change this to your repo.
       editUrl:
         'https://github.com/facebook/docusaurus/edit/master/website/blog/',
     },
     theme: {
       customCss: require.resolve('./src/css/custom.css'),
     },
   },
 ],
],
After the addition, the docs directory will look like the following.
docs: {
  routeBasePath: '/',
  sidebarPath: require.resolve('./sidebars.js'),
  // Please change this to your repo.
  editUrl:
    'https://github.com/facebook/docusaurus/edit/master/website/',
},
Next, delete the following directory.
/src/pages/
If you want to delete only the default top page, delete the follwing file.
/src/pages/index.js
Note that if you delete this directory or file while the server is running, an error message will be shown in your browser or Page Not Found will be displayed.
This occurs because you have not specified the homepage you want to use instead of the default homepage /src/pages/index.js.
To fix this, create a markdown file for the home page in the docs directory and add a slug to specify the URL.
As an example, create the following file.
/my-website/docs/my-home.md
Write the following at the beginning of the above file.
---
slug: /
---
Now, when you access the top page http://localhost:3000/, the contents of /my-website/docs/my-home.md that you specified before will be displayed.
From here, you can further customize docusaurus.config.js for your own site.
Add the repository URL of the manual site
If you are using Git to version control your documentation site, you can set the URL of the repository.
With this setting, each page will have a link for editing, and you can click it to access the specified remote repository directly.
The section to edit is the editUrl in the docs array under presets in docusaurus.config.js.
docs: {
  routeBasePath: '/',
  sidebarPath: require.resolve('./sidebars.js'),
  // Please change this to your repo.
  editUrl:
    'https://github.com/facebook/docusaurus/edit/master/website/',
},
Edit the header and footer
Edit the header
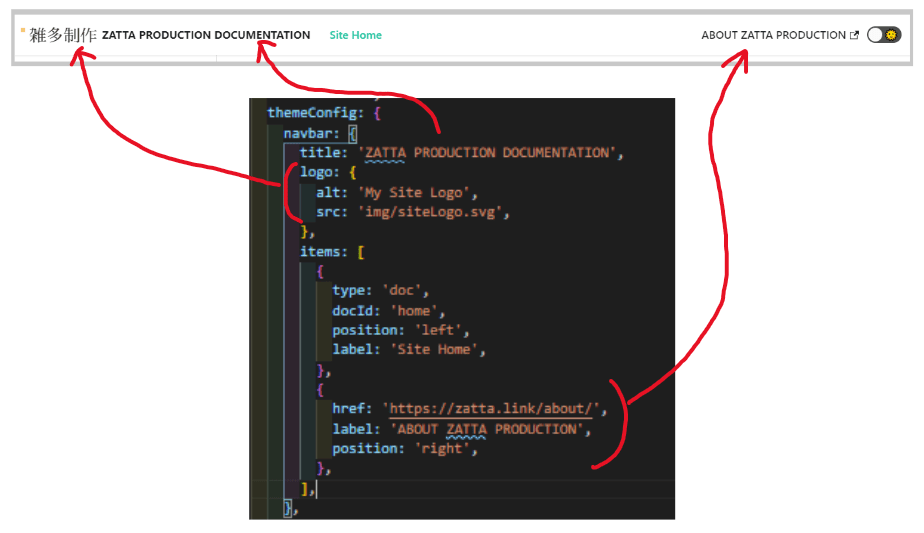
The header, footer, and logo images can be changed by editing themeConfig in docusaurus.config.js.
First, for the header navigation, edit the following navbar object.
Here you can set the text to be displayed, internal site links, and external links.
navbar: {
 title: 'My Site',
 logo: {
   alt: 'My Site Logo',
   src: 'img/logo.svg',
 },
 items: [
   {
     type: 'doc',
     docId: 'intro',
     position: 'left',
     label: 'Tutorial',
   },
   {to: '/blog', label: 'Blog', position: 'left'},
   {
     href: 'https://github.com/facebook/docusaurus',
     label: 'GitHub',
     position: 'right',
   },
 ],
},
Let's try the following change.
navbar: {
 title: 'ZATTA PRODUCTION DOCUMENTATION',
 logo: {
   alt: 'My Site Logo',
   src: 'img/siteLogo.svg',
 },
 items: [
   {
     type: 'doc',
     docId: 'home',
     position: 'left',
     label: 'Site Home',
   },
   {
     href: 'https://zatta.link/about/',
     label: 'ABOUT ZATTA PRODUCTION',
     position: 'right',
   },
 ],
},
I removed the following part of the blog link because it is not needed.
{to: 'blog', label: 'Blog', position: 'left'},
Also, a logo image img/siteLogo.svg and a new page for documentation docs/home.md have been added.
In docs/home.md, I put the following.
---
sidebar_position: 1
id: home
---
How to write a markdown file will be explained later.
For now, it's OK. Just remember what you have done.
The header has now been changed.
It should now look like this;
Edit footer and copyright
As with the header, you can change it by rewriting footer and copyright.
Note that since you changed the homepage of your site to a file under docs, if the footer link contains /docs/your-page, the link will be broken and you will need to remove docs.
Delete the blog
Delete the /blog/ directory as it is not used.
Also, remove the blog setting in docusaurus.config.js below.
blog: {
  showReadingTime: true,
  // Please change this to your repo.
  editUrl:
    'https://github.com/facebook/docusaurus/edit/master/website/blog/',
},
Edit the basic information of the site
The basic information about the site is set in the following section at the beginning of docusaurus.config.js.
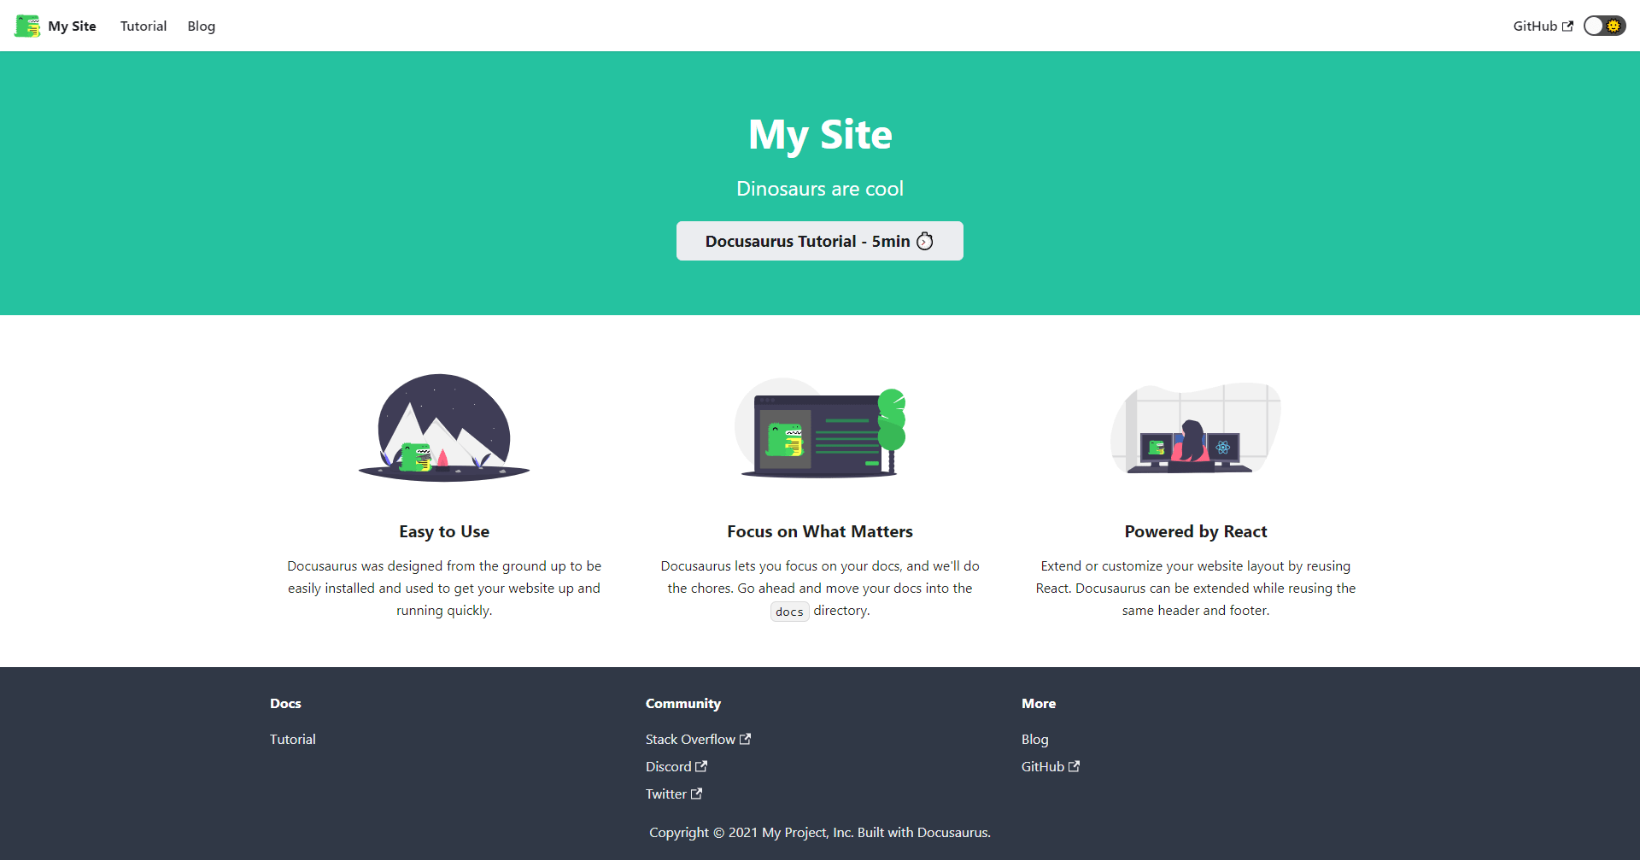
title: 'My Site',
tagline: 'Dinosaurs are cool',
url: 'https://your-docusaurus-test-site.com',
baseUrl: '/',
onBrokenLinks: 'throw',
onBrokenMarkdownLinks: 'warn',
favicon: 'img/favicon.ico',
organizationName: 'facebook', // Usually your GitHub org/user name.
projectName: 'docusaurus', // Usually your repo name.
In the url field, enter the URL to which you want to upload the final built file.
If you do not enter this correctly, the links in your site will not be output correctly when you build.
You can also set the favicon here.
The organizationName is usually your GitHub organization name or user name, and the projectName is the repository name.
Next, we will finally create a markdown file for the documentation.
Create a .md file in the docs directory to create a page.
Syntax of meta-information in markdown files
At the beginning of the markdown file, enter the following information.
---
id: doc1
title: Style Guide
sidebar_label: Style Guide
sidebar_position: 1
---
Each item has the following roles.
- id
- Unique ID for each page.
- This will be the URL of the page.
- If omitted, the ID will be the file name without the extension.
- If you have created a sub-directory under the docs directory, the ID should be the path including the sub-directory (e.g.
sub-directory/your-name). - This ID is used to explicitly register a page in the sidebar.
- title : The page title. It will be displayed as
h1at the top of the page. - sidebar_label : The text to be displayed in the left sidebar.
- sidebar_position: A number used to specify the order of the sidebars. By specifying this number, you can explicitly change the display order.
If you want to separate ID and URL, specify slug as follows.
---
id: part1
slug: your-url.html
---
You can also specify slug as an absolute path or a relative path.
For absolute paths, it looks like the following.
slug: /mySlug
In the case of a relative path, it looks like the following.
slug: mySlug
slug: ./../mySlug...
Register pages to the sidebar
Docusaurus will automatically add the sidebar by default, depending on the structure of the docs directory.
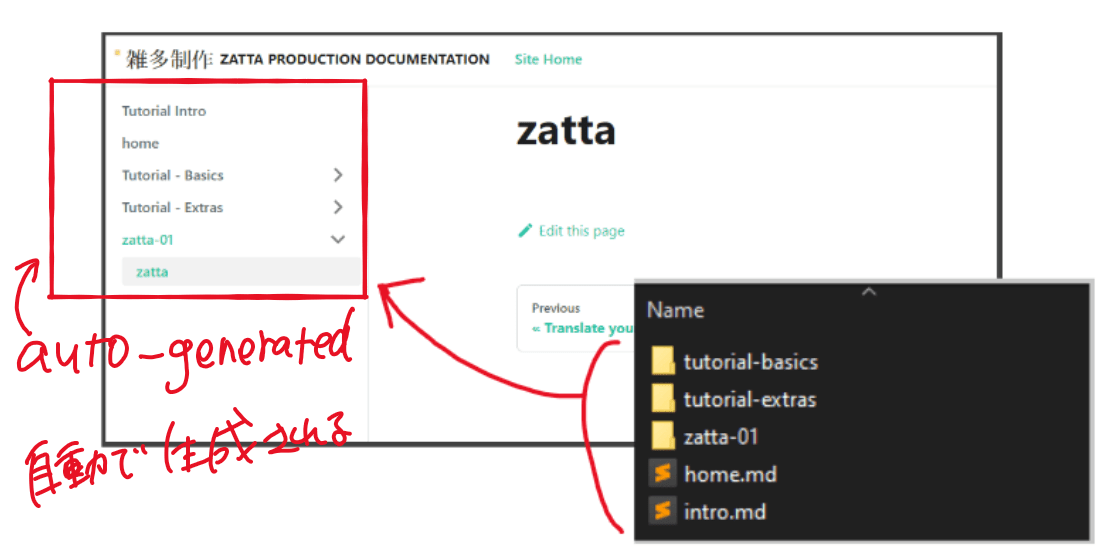
I created a directory named zatta-01 and the files under it for the purpose of testing.
For automatic generation, put the following code in sidebar.js (this is the default value).
module.exports = {
  tutorialSidebar: [{type: 'autogenerated', dirName: '.'}],
};
On the other hand, you can edit it in any order.
There are several options, which I will describe below.
First is the basic syntax.
module.exports = {
  mySidebar: [
    {
      type: 'category',
      label: 'Heading 01',
      items: ['intro'],
    },
    {
      type: 'category',
      label: 'Heading 02',
      items: ['home', 'zatta-01/zatta'],
    },
  ],
};
This will display the sidebar as shown below.
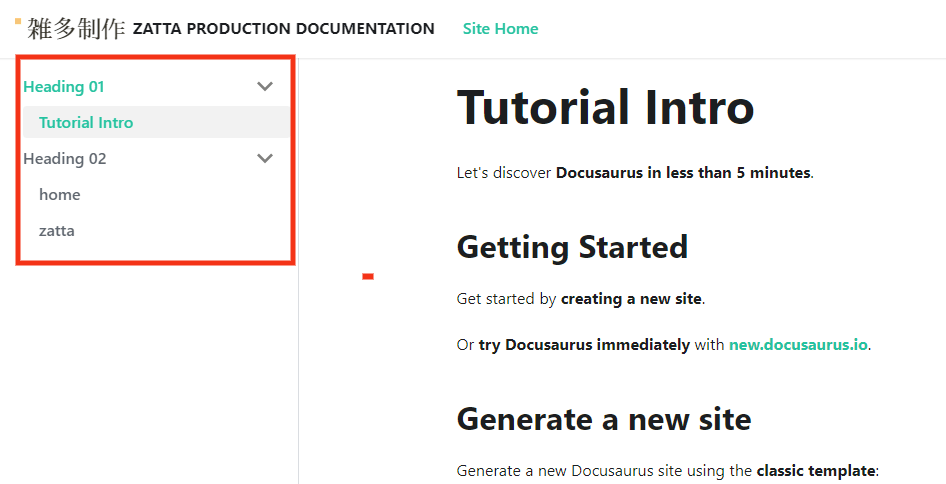
Short-hand is also available, and can be written in short code as shown below.
module.exports = {
 mySidebar: {
  Heading 01: [
  'home',
  'zatta-01/zatta',
  ],
  Heading 02: [
  'intro'
  ],
 },
};
You can also change the sidebar to be displayed depending on the page you are viewing.
The following will display mySidebar01 when browsing home and zatta-01/zatta pages, and mySidebar02 when browsing intro page.
mySidebar01: {
 'Category A': [
 'home',
 'zatta-01/zatta',
 ],
 'Category B': [
 'home',
 'zatta-01/zatta',
 ],
},
mySidebar02: ['intro'],
How to decorate a markdown file
Overview
Docusaurus supports the common markdown syntax.
For more information on markdown syntax, please refer to this article.
Daring Fireball: Markdown Syntax Documentation
Links
Both URL paths and relative paths to files are supported for links.
Here is some example.
[Create a page](/create-a-page)
[Create a page](./create-a-page.md)
The .md extension will be removed from the URL if the file path is written with the extension included.
Note that if the id is specified in the file, the id has priority as the URL, not the file name, as described above.
Images
Images should be stored in the static/img/ directory, but when writing links, specify a path that excludes the static directory.
Below is an example.

The img directory can be organized in subdirectories.
Code block
The code block supports syntax highlighting.
Like below, if you specify the language to be written in the code block, the code will be highlighted.
```css
.container {
  width: 100%;
}
##### Admonitions
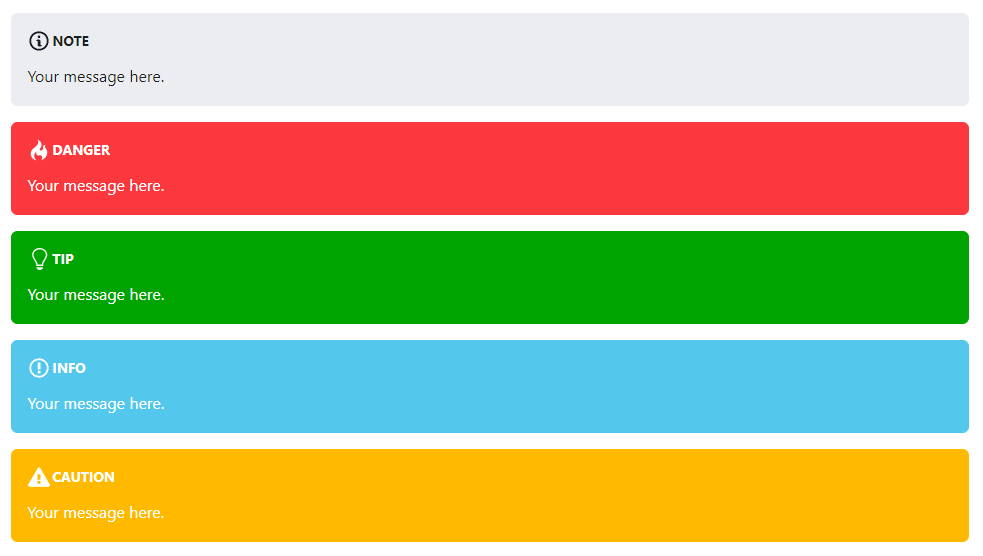
Docusaurus provides its own syntax for the Admonitions component.
It is like an alert box, and you can generate various types of boxes by writing the following.
:::note Your message here. :::
:::danger Your message here. :::
:::tip Your message here. :::
:::info Your message here. :::
:::caution Your message here. ::: ```
Each of them will be displayed as shown below.
You can also give it a custom title by writing as follows.
:::note YOUR TITLE
Your message here.
:::

Customizing CSS
You can customize the CSS for the entire site by editing the following file.
/src/css/custom.css
Build for the production environment
Execute the following command in a terminal.
npm run build
Then, the build directory will be created and the files for the production environment will be generated there.
Upload this set of files to your server and your site will be displayed.
Notes on building
Please note that if you remove the pages or blog directory and a link to this directory is specified in a page under docs or in docusaurus.config.js, the build will fail with a "broken link" error when building.
Check the error message to see which link is broken, and try to find the corresponding file from there.
Check the built files in the local environment
The following command will run the files in the build directory on localhost.
npm run serve
Deployment
Docusaurus comes with the feature to deploy to hosting services such as GitHub Pages and Netlify.
Please check the official documentation for details.
If you are uploading to a server that does not support the deploy function, upload the complete set of files in the build directory via FTP or other methods.
Advanced Options : Set up a Algolia DocSearch site search
You can use Algolia DocSearch as a site search in Docusaurus.
Algolia DocSearch is a service that crawls your site and creates an index to enable site search.
Therefore, to use this service, it is a prerequisite that the site is open to the public.
Please note that this service cannot be used for sites that require access restrictions.
For implementation, please refer to the following document.
Search | Docusaurus
Advanced Options : Add noindex, nofollow meta tags to your site
If you want to make your documentation site private, you need to set up restrictions by IP address, Basic authentication, etc. You can also add noindex, nofollow meta tags to your site by adding the following code to docusaurus.config.js.
noIndex: true,
This will insert the following meta tags into each page.
<meta name="robots" content="noindex, nofollow">
You can customize many more things as well
In addition to the functions introduced in this article, there are many other functions available.
Here are some examples.
- Creating a version of a documentation and making it selectable with a pull-down
- Create your own components with React
- Inline Table of Content generation
- Site localization features
There may be many other things you can do, but this article is enough to create a manual website.
If you want to create a manual with a simple design, but with a rather large number of pages and well-organized information in a short time, this is the right tool for you.
Once I use Docusaurus, I don't feel like creating manual with dozens of pages in PowerPoint or Word anymore....
Use Pandoc or StackEdit in case you can't upload to the server.
Docusaurus is a very useful tool, but it requires a web server.
If you open a set of files in the build directory on your local machine, they will not be displayed correctly.
Even if you want to display them in a local environment, you will need to set up a web server.
For this reason, if you want to browse easily in a local environment, I recommend using StackEdit or Pandoc, which also convert markdown files to HTML with a table of contents.
Please check the following article for more information on these.
Check this article!
3 tools to convert Markdown to lovely HTML